Under Construction
04 - Sample Mode
When you run AKAINOID Sample Mode for the first time, most likely an alert
box will pop up after a few seconds saying
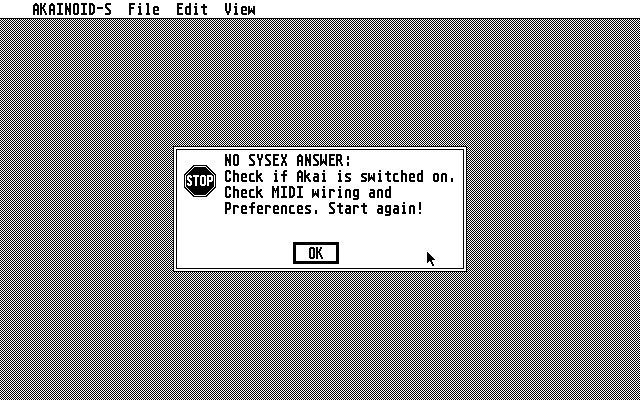
Don't worry, this is natural behaviour on a first run of the application even if
your sampler is switched on and the MIDI wiring is correct.
04.01 - Editing The Preferences
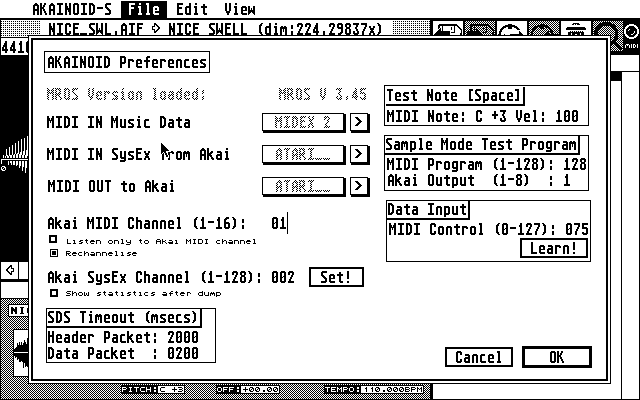
You now need to choose Edit Preferences from the pull-down menu in the File
section and provide information about how you have set up and connected your
Akai sampler.
There are 2 ports to set up for MIDI IN: One for receiving the Akai SysEx data and a second one for incoming music data sent by a connected MIDI keyboard or a second computer/Atari running a sequencer program. If you have a MIDI Merger's OUT connected to one of your Atari's MIDI INs, these two ports can actually be the same. The MIDI OUT port should be the one connected to your Akai.
Step through your available MIDI ports by clicking the [ > ]-buttons behind
the port names. The amount of available ports varies depending on your
connected extra hardware supported by MROS (like a MIDEX+) considered you
have copied the corresponding MROS driver to your AUTO folder as explained
above.
NOTE:
There are always MROS ports available. Choose these MROS ports at your
own risk. They are virtual MIDI ports between multi-tasking Steinberg
applications such as Cubase and Synthworks. I know little about MROS
multi-tasking, so I can't tell what will happen, if you choose an MROS port.
Allthough it is highly unlikely, but if a chosen MROS MIDI port should work
out for you, please tell me about it in an email!
Enter the MIDI and SysEx channel as you chose them on your Akai sampler.
NOTE:
A feature I had forgotten to implement for a long time is to set the
SysEx channel on the Akai to what you have entered in this very dialog. This
is what the [Set!]-button is for. When you have saved the preferences, this
SysEx channel is set on the Akai everytime you start SINGLE or PROGRAM mode.
You can choose whether AKAINOID shall listen to only the MIDI channel
specified or if MIDI data coming in on the Music port should be
rechannelised to the MIDI channel of the Akai program selected (which is
important in PROGRAM Mode).
If you don't care for the sample dump statistics after a sample transfer,
you can deselect this feature.
The nature of your MIDI network (especially when MIDI Merges are in between
the Atari and the Akai) and running AKAINOID in an Atari emulator can
significally slow down sample dumps, so the time it takes until the Atari
receives an Akai confirmation of a received dump package via MIDI can exceed
certain time limits (timeouts). You can increase these Timeouts in milliseconds if your sample dumps fail or there are too many
lost packages (for me one lost package is one too many).
A customised test program called AKAINOID is generated on the Akai during initialisation of
Sample Mode. It can be set up, so you can play back the
sample in Sample Mode on one of the Akai's individual outs. This Akai
program will be removed again from the Akai as soon as you leave SAMPLE
Mode.
Furthermore I plan a MIDI controller knob on your master keyboartd to be set
up for data entry - at least for suitable parameters of the sampler. You may however already set up the MIDI controller number by entering or learning.
When you started the learning process clicking the button, move your controller knob as fast as you can. A split second after leaving the knob alone,
your controller number should be filled into the Preferences dialog.
Close this dialog and confirm your changes by clicking [ OK ].
04.02 - Saving The Preferences
These settings amongst others are stored in a file called AKAINOID.INF in
your application folder when you choose "Save Preferences" from the File
menu.
NOTE: Delete this file everytime you rewire your Akai or you connect or
disconnect MROS hardware to/from your Atari, otherwise your computer
will most likely freeze.
04.03 - Initialisation
Restart or Re-Initialise SAMPLE Mode after saving Preferences. Once
you have actually wired up your Akai correctly, take notice of the detected Akai model
and its available RAM:
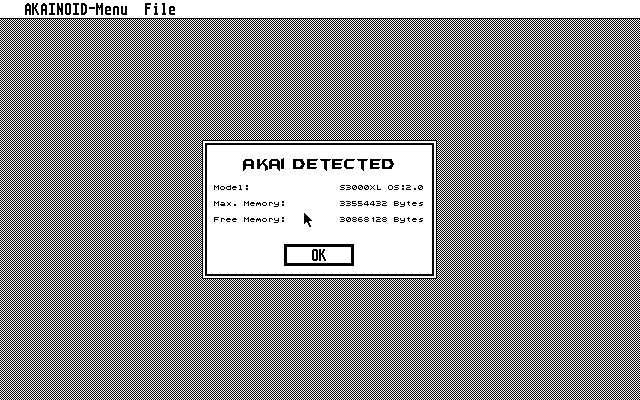
NOTE: I only have an S3000XL, which confirms its presence with a number code "17.0",
AKAINOID happily translates to "S3000XL OS:2.0". If you have a different Akai model or
operating system on your Akai, by now only its number code will be displayed.
Please send an email to me, if your code is different and let me know your code plus your sampler's
model name and its precise specification.
In case there are samples loaded to the memory
of your Akai, the application will now ask you if you want to delete or
plan to match those samples.
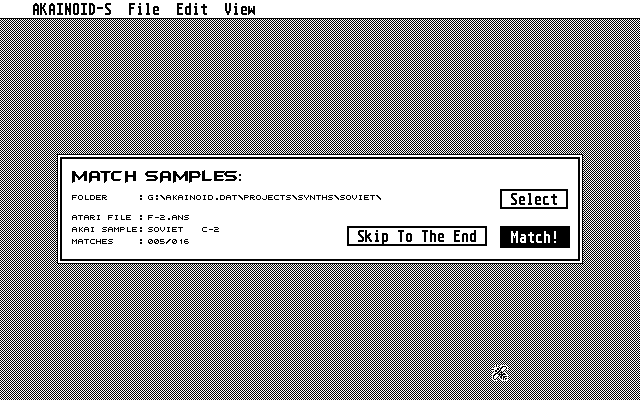
When matching a further alert box will pop up asking you if you
want to match the samples on the Akai with those actually saved in the
AKAINOID library folder on your Atari. This process may take some time
depending on the size of your AKAINOID library and may be skipped.
r/>
NEW:
You may know select a base folder different from the library folder for the matching process
limiting the time it takes to match the samples. You may skip the rest of
unmatched samples by clicking [ Skip To The End ] (Sorry for the reference to the telly series "Spaced").
You can go through these initial dialogues again later on
by choosing Re-Initialise from the pull-down menu or by pressing [Ctrl]+[I]
on the keyboard.
04.04 Sample List
Finally the application will present the Sample List window to the right of the screen already filled with samples or not depending on your choice and samples actually loaded to the Akai's RAM on start-up. Note that AKAINOID at this point in time only knows a sample's name on the Akai, all additional data must still be retrieved via MIDI unless there's been success on fully matching the sample.
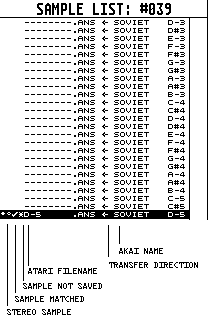
The samples are represented by lines in the Sample List Window, which has six distinct columns of which the very right one is the 12 characters wide sample name on the Akai.
Next to the Akai name to the left is a horizontal arrow indicating the initial origin of the sample and the transfer direction: If the arrow points to the left away from the Akai name, the sample's origin is the Akai. If the arrow points to the right towards the Akai name, the sample origin is the Atari.
One more column to the left there is the 8 characters wide Atari file name plus its extension.
The first column, which is 2 characters wide will indicate a stereo sample, once AKAINOID supports stereo samples.
The second column contains a check mark if the raw sample data has been matched: The sample has been transferred and exists inside the Akai's RAM as well as on the Atari's hard disk.
An asterix in the 3rd cokumn indicates that the state of the sample data needs to be saved.
Since you haven't loaded or imported any samples or audio files to the application yet, all arrows should point to the left presumed the sample list isn't empty.
You can browse and scroll through this list as you wish. You can press [CURSOR UP] and [CURSOR DOWN] to move up or down a line in the list or just select a sample line using the mouse. The list index is displayed in the window's title bar.
04.05 Receiving A Sample
If you choose "Receive Sample ..," from the File menu (alternatively press [R] or click the icon in the Tool Box above the sample list), a sample dump from the Akai is requested and the data of the selected sample is being received following the protocol of the Sample Dump Standard (SDS).
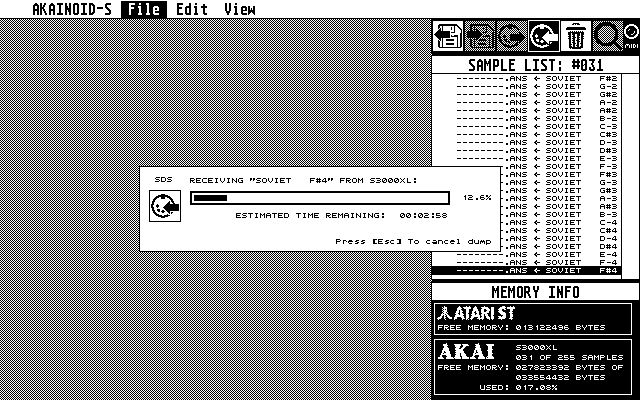
A dialog box will pop up displaying the progress of the dump and the Estimated Time Remaining. Note that depending on the length of the sample, this process takes quite some time. In my current set-up receiving the dump of a 44100Hz sample lasting precisely 4.0 seconds is taking about 3:55 minutes.
When the dump is complete a further dialog box will show statistics of the transfer. The information displayed might help you to improve your MIDI wiring for AKAINOID especially when many dump packets have to be requested again. You may bypass these stats in the Preferences.
When receiving the sample data has succeeded and you have inspected the statistics, two more windows will open, of which one shows the waveform of the sample and of which the other shows the sample properties as they are provided by the Akai sampler. Neither of these three windows now open can be moved or resized yet.
In the sample list you should now see a check mark in the first of the afore-mentioned remaining columns indicating that the sample data is matched: Both Akai and Atari now hold the same information about the sample. The second column between the check mark and the Atari file name should display an asterix telling you the sample still needs to be saved to disk on the Atari.
04.06 Saving
Save the selected sample by choosing "Save ..." from the File menu (or by pressing [Ctrl]+[S]). A customized file selector will pop up.
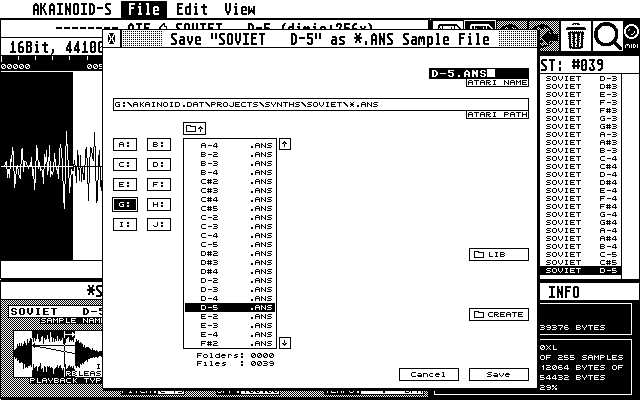
You can edit the Atari file name displayed in the file selector for Saving. When you press [Ctrl]+[X] while editing the Atari name, the rest of the name is ignored and the correct file extension will be appended (.ANS).
NOTE:
The customised AKAINOID file selector accepts characters the standard Atari file selector doesn't, even though they are supported by TOS. Just think about how important the character "#" is in music:
- digits '0' - '9'
- letters 'A' - 'Z'
- characters '_', '#', '!', '+', '-', '=', '~', '<', '>', '|'
All shortcuts of the Open/Import file selector work for the Save window, too.
You can create a new folder carrying the Atari file name entered, by clicking the corresponding button.
Saving a sample on the Atari will actually generate three separate files in the chosen destination folder carrying the same name but different extensions:
- the .ANS file: this AKAINOID file type stores all information relevant to both the application itself as well as the Akai sampler. As AKAINOID is nowhere near to being complete, the file structure will grow and change in future releases but should keep backwards compabiltty.
-
the .AIF file: compatible with the Audio Interchange File
Format "AIFF" as described in the standard for sampled sound
files, version 1.3 by Apple Computer, Inc.
The file extension on modern computers usually is ".aiff",
the limitation to 3 characters just is demanded by the Atari
file system.
Contains the raw sample data. You should be able to open .AIF files generated by AKAINOID in any audio editor capable of loading .AIF(F) files such as SquashIt! on the Atari STE and Falcon or Audacity or WaveLab by Steinberg on Microsoft PCs. - the .SYX file: containing the SysEx header data according to the S1000 protocol. You could actually import this file into Cubase and send it from there.
04.07 Importing
In order to get a sample, which wasn't generated by AKAINOID, onto the sample list, you need to Import an audio file by choosing "Open / Import ..." from the File menu or by pressing [Ctrl] + [O].
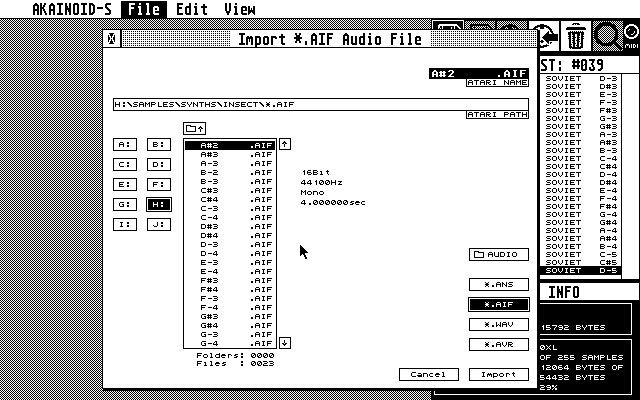
Now a customised file selector will pop up initially showing you a list of Akanoid *.ANS files. Select either *.AIF or *.WAV (.*.AVR files aren't supported yet). The button initially labeled with "Open" should show "Import" instead once you selected a file of these types.
Note that the bit depth of both file types must be 16Bit PCM and the sample rate must be either 44100Hz, 22050Hz or 11025Hz. Trying to load samples with different properties will now lead to an AKAINOID error message and the show will continue. Future releases will support *.AVR and maybe *.SMP files, too.
The imported file will be added to the Sample List at its end and can be saved to disk as a proper .ANS sample once it was transmitted to the Akai.
NOTE:
The bug of AKAINOID freezing when reading .AIF files containing extra information like tags for artists and the likes or markers should be history and fixed. AIFF chunks unknown or irrelevant to AKAINOID are simply skipped while loading.
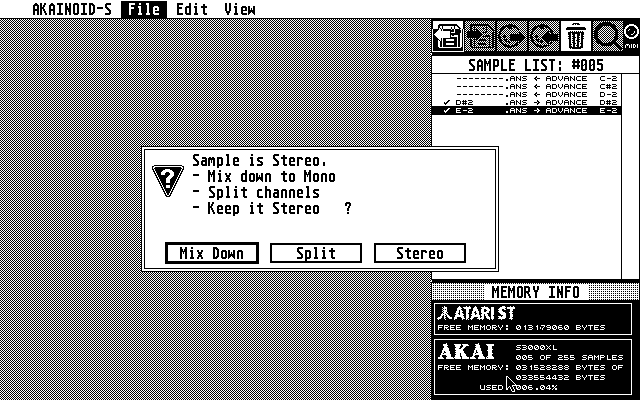
Furthermore you may now import stereo files considered you convert them to mono while loading. An alert box pops up asking you if you want to mix down to mono or rather split the stereo file into two seperate mono files (L/R). There's no sense in trying to load stereo not mixed down or split into mono files as AKAINOID by now can't process stereo data properly.
In the case of mixing down or splitting in mono AKAINOID will generate one or two .AIF files in your import directory:
- an .AIF file with a "|" as the last character of its filename for mix-downs.
- an .AIF file ending with "<" and one ending with ">" for the left and right stereo channels in case of splitting to mono.
you can keep or delete these files as you wish.
More on the new file selector windows later.
04.08 Renaming On Akai
Clicking the area of the Akai name of an already selected sample in the Sample List while
keeping [Alt] pressed, will start an in-line editor for editing the sample name.
If the sample was either transmitted to the Akai or originates from the sampler, the sample will be renamed not
only in the Sample List but also on the Akai as soon as you confirm the new
name by hitting [Return] in the in-line editor.
You can also edit the Akai sample name in the sample properties window allthough you don't need to press [ALT] while clicking into its field. Characters accepted by the editors for the Akai sample name:
- All letters from 'A' to 'Z'. (no need for holding [Shift]]
- All digits from '0' to '9'
- ' ' (Space)
- '+", '-'. '#' and '.'
04.09 Open/Import (The AKAINOID File Selector)
This will open the custimized file selector for opening *.ANS files or importing standard audio files. The basic functions should be obvious. You can step through sub directories of your library by double clicking on folder items in the list shown. Depending on the chosen file extension to filter your selected directory list, the button on the very bottom right should say "Open" (for *.ANS files) or "Import". In any case a folder selected it should say "Open" and clicking "Open" or hitting [RETURN] will open the folder. If an *.ANS file selected it should just start the loading process. For all other file types the importing process.
Depending on the file type more or less sample properties are shown in the middle of the window.
You can define two folders on your Atari disk as default folders.
The button labeled with "[Folder Symbol] LIB" (Akainoid Sample Library) or "[Folder Symbol] AUDIO" (audio pool/inbox) will open the corresponding folder stored in the Preferences ("AKAINOID.INF"). You can set both folders to the current directory path by holding [CTRL] when clicking this button.
Think of the Library folder as the root of your AKAINOID database and choose it and its folder structure underneath wisely. Avoid moving files or renaming files inside this folder or its subfolders or even opening and editing files inside of a text editor. Under no circumstances do stuff like this especially when you are drunk! A file selector asking for .ANS files will always open this folder initially.
Think of the Audio folder as the inbox or audio pool of AKAINOID. Copy audio files to be imported to this folder. Everytime you're about to import an audio file, the file selector will open this folder initially.
Both folder locations are stored in AKAINOID.INF when Saving Preferences.
More functions of the File Selector:
- Holding [SHIFT] while clicking one of the arrow buttons, will scroll down/up the list by a page.
- In order to browse through the file list you can also hit [CURSOR UP] or [CURSOR DOWN].
- In combination with [SHIFT] this will also scroll by a page.
- [CLR HOME] will scroll to the first index of the list.
- Holding [SHIFT] while pressing [CLR HOME] will scroll to the file list's end.
NOTE:
The Open/Import window unlike the Save window doesn't allow editing the Atari file name shown in the upper right.
The sample is loaded (or the audio file is imported) including its raw data in the corresponding .AIF file and is added to the Sample List at its end, where it awaits transmission to the sampler.
04.10 Transmitting A Sample
A sample which was loaded or imported to the Sample List can be transferred to the Akai by choosing "Transmit Sample ..." from the File menu, by pressing [T] or clicking the icon in the tool box. This will start a sample dump to the Akai following the protocol of the Sample Dump Standard (SDS).
A dialog box popping up is keeping you updated about the dump progress and the estimated time remaining.
When the dump has finished successfully, the sample will be instantly renamed on the Akai as you have chosen and a final dialog box shows the dump's statistics (if activated in the MIDI Setup). Tranferring a sample of precisely 4.0secs to my S3000XL takes me about 3:42mins on my Atari MegaSTe running at 16MHz.
Once a sample was transmitted to the sampler successfully, a check mark in the first column of the Sample List indicates that the sample data was matched between the Atari/AKAINOID and the Akai sampler.
Allthough I haven't really visualised the matter on screen yet, the Sample List actually can be divided into two parts/areas:
- First area: the samples which already have been transferred to the Akai or originate from the sampler (arrow in the 4th column points to the left or check mark is set) ... and in the
- Second area: those samples which originate from the Atari's disk and haven't been transmitted to the sampler yet (arrow points to the right, check mark is not set).
You can change the order of samples within the second area by dragging and dropping a selected Sample List item. However you cannot drop a sample into the first area.
One thing about the Sample List and the samples it contains, should still be pointed out allthough you might have already noticed: Only the currently selected sample in the Sample List, whose waveform is also displayed in the Sample Window, is actually loaded to the RAM of your Atari completely including its raw sample data. As soon as you select a different sample in the list all the memory the raw sample data consumes is released and replaced by the data of the new selection given the fact the data has already been matched. The advantage of this agenda is clearly a lot more memory space and hence a possibly longer play time per sample. The disadvantage is that browsing through the list is interrupted regularily by a few seconds of loading the sample data back from disk.
04.11 More Menu Items
Keyboard shortcut: [Delete]). The selected sample is removed from the Sample List and deleted from the Akai's RAM, but not from the Atari's disk drives.
04.12 The Sample Window
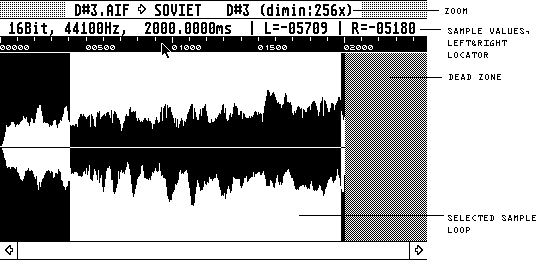
The Sample Window shows the waveform of the sample loaded. You can span up loops using the mouse. If no loop has been spanned up yet, click into the sample window to define the loop point (at:). Click the cursor now visible and keep the mouse button pressed to span up the loop by moving the mouse leftwards. Once you release the mouse button, the new loop data is being transferred to the Akai. A spanned up loop can still be modified by dragging its right (loop point) or left (loop length) locator.
Press [Esc] in order to deselect the loop spanned up or choose the
corresponding menu item from the Edit menu.
You can zoom in and out the sample and scroll through it from start to finish. Use the corresponding menu items in the View menu or [Num +] and [Num -] to do so. As the loop usually is demagnified, the diminuition factor is displayed in the window title (actually the number of sample frames per pixel).
NEW:
I reprogrammed zooming so the diminuition factor is always exponents of 2 instead of weird floating point values. This leads to a greyed out area behind the actual sample I call the Dead Zone. It really is dead, there's no point in clicking into it!
There is an alternative view displayed in the sample window, which is more precise but the downside of the view being the time it takes until the waveform is completely displayed.
You can make the selected loop span up the entire sample by choosing "Select All" from the Edit menu or pressing [Ctrl]+[A]. Given a certain Loop Point (at) you can max out the loop length by choosing "Max Out Loop Length" from the menu or by pressing [Ctrl]+[M]. "Find Equal Amplitude" or [F] is at an experimental phase and resembles the FIND function in the LOOP editor of the S3000XL.
04.13 The Sample Properties Window
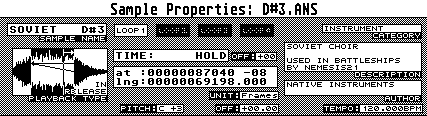
You can rename the Akai sample name by clicking it. A blinking cursor will show up (as described earlier).
You can select one of 4 possible loops by clicking its button. If you hold [Ctrl] while clicking it, the loop will toggle from inactive (loop time is set to 0) to active (loop time is set to 9999/HOLD). If inactive the loop button is overlayed by a dotted pattern.
The sample playback type can be changed by clicking the big icon below the Akai sample name.
Further Akai Sample Properties are the Loop Tune Offset to the right of the Time, the original pitch, which may as well be entered on a MIDI keyboard connected to the Music MIDI In port of your Atari and the Pitch Offset. When clicking the left mouse button you increment these values by one or a suitable higher number (like 12) when holding [Shift] while clicking. Right-clicking a value will decrement it in the same fashion. Hold [Ctrl] in order to enter the value on the Atari's keyboard.
You can edit the loop time by clicking it while holding [Ctrl]. A blinking cursor will show up and you can enter a new time.
You can disable the loop by hitting [X] or set it to HOLD by hitting [H] while the cursor is blinking. Further editing features are like they were described during the sample renaming process above.
Clicking one of the digits of the loop time will increment or decrement this digit depending on the mouse-button (left/right).
You can manually enter the loop point (at:) and its length by clicking the values while keeping [Ctrl] pressed instead of graphically spanning it up in the sample.
Hitting M while editing these two loop properties will max out their values. You can show these two loop parameters in msecs, too. Click the Unit button to toggle between frames and msecs. Note you cannot enter msec values only frames.
Clicking one of the digits of a loop parameter will increment or decrement this digit depending on the mouse-button (left/right).
In the the last column of the Sample Properties window, there are more fields which are irrelevant to the Akai but might be of value for your own purposes. A sample category can be chosen from a picklist, a short description and the name of the author of the sample can be edited and the tempo of the sample in BPM can be set. These librarian properties are displayed when choosing an *.ANS file in the file selector window.
From the pull-down menu or by hitting [CTRL]+[D] you can make the current librarian properties default so you don't need to fill in the same data again for further samples you are about to import. Clear these defaults by selecting the corrsponding pull-down menu item.
You can copy and paste the properties of the selected loop (Time, At and Length) at ther same time by hitting [CTRL]+[C] and [CTRL]+[V] or by choosing the corresponding menu item.
NOTE:
You can't change any sample properties apart from the Akai sample name before the sample has been transmitted to the sampler.
04.14 MIDI Thru
While AKAINOID is idle and isn't transmitting or receiving dumps, you may audition the current sample. MIDI Note-Ons and -Offs received by the Atari on the Music In port will be forwarded to the Akai (see Preferences). An on-screen LED in the Tool Box visualises MIDI data forwarded from the Music In port to the Akai.
When starting up Sample Mode generates a test program on the AKAI called AKAINOID. You can specify an individual output (1-8) of the Akai on which the sample is played back in the Preferences together with the MIDI program number of this Akai program. When leaving Sample Mode this test program will be deleted from the sampler.
04.15 The Toolbox:

AKAINOID's most important functions have an icon in the Toolbox in the upper right of the screen, which are from left to right:
- Load/Import
- Save
- Transmit Sample Dump
- Receive Sample Dump
- Delete Sample
- Find Equal Amplitude
Furthermore an on-screen LED visualises MIDI data forwarded from the Music In port to the Akai as part of the MIDI Thru feature. Clicking this LED will play the test note specified in the Preferences dialogue.
04.16 The Memory Info Window

The Memory Info Window is located in the bottom right corner of the screen
04.17 Important!:
DON'T HIT ANY BUTTON NOR TURN ANY WHEEL ON THE AKAI WHILE WORKING WITH AKAINOID !!!
AFTER YOU LEFT AKAINOID DO NOT FORGET TO SAVE YOUR WORK ON THE AKAI, TOO. IT WILL SAVE YOU VALUABLE TIME TRANSMITTING YOUR SAMPLES AGAIN.
If you have any questions concerning the usage of AKAINOID, don't hesitate to send an email to me (Marcus, use the email adress in the application's About box below):