Under Construction
05 - Program (Single) Mode
Choose Program Mode from the main menu application (AKAINOID.PRG). If an Akai sampler is detected on the MIDI ports specified in the Preferences dialog, a dialog box will show its software version (my SX3000XL actually shows v17.000) as well as its maximum and free amount of RAM. If not, an alert box will pop up telling you to check your MIDI wiring and MIDI settings in the Preferences, which you shouldn't forget to save.
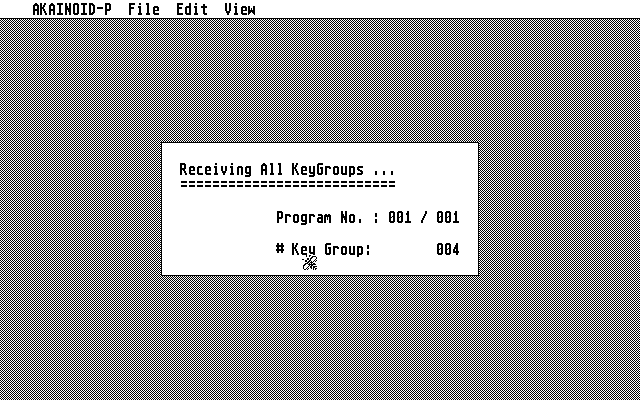
On success AKAINOID is retrieving the Akai's sample list and all of its programs and keygroups and the Program Mode part of AKAINOID presents its initial screen with the following windows open (detailed descriptions will follow):
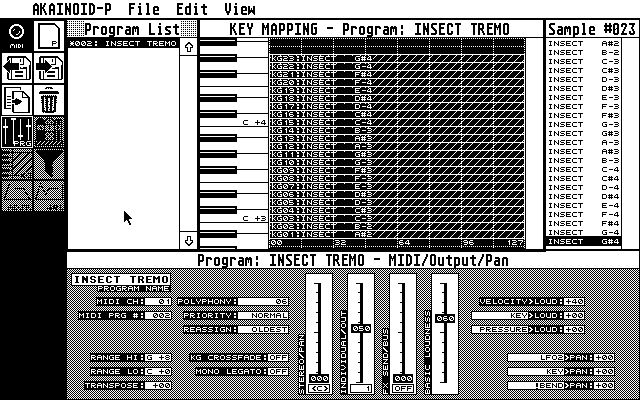
To the left there is the ToolBox presenting icons for a couple of application functions and views as well as a LED, which is highlighted everytime you play a note on your master keyboard correctly connected to AKAINOID/your Atari. Clicking this LED will play the test note specified in the Preferences.
Next to the ToolBox there is the Program List showing all Programs (singles) inside the RAM of the Akai. The number displayed by the way isn't the list index but the MIDI program number. A preceeding asterix indicates, that the current state of the Program hasn't been saved to the Atari yet.
Below there is an area for Properties of the selected view (on start-up: Program Properties). This window is being replaced often as you choose different views and will show various Properties of the AKAINOID object (basically Program or KeyGroup) selected.
To the centre of the screen there is the Key-Mapping window showing all
KeyGroups of the Program selected in the Program List from the lower end of
the MIDI keyboard to the higher (bottom to top). You can change size and
location of these KeyGroups and create new KeyGroups by dragging and
dropping a sample from the Sample List to the right into the Key Mapping
area.
This key mapping editor can be replaced by the Velocity Zones editor.
Clicking on keys of the vertical keyboard displayed will play the corresponding MIDI note on the Akai as long as you keep the mouse button pressed. The velocity of this note is the same as the test note's velocity specified in the Preferences.
The Sample List is displaying all samples loaded to the RAM of the Akai. Drag lines from this list to the Key Mapping editor in order to create a new KeyGroup or replace a sample inside an existing KeyGroup by dragging a line and dropping it onto the SAMPLE field in the KeyGroup/Zones editor when open.
05.01 The Program Editor
If there isn't any keygroup selected in the Key Mapping editor, the bottom area of the screen will show the Program Editor displaying all parameters directly related to an S3000XL Program and not to one of its Keygroups.
These parameters all have the same label as when editing on the S3000XL itself and their purposes can be looked up in the S3000XL Operator's Manual by Akai.
- Typically you increment a parameter value by left-clicking it and decrement it by right-clicking it (I might add a feature allowing to swap the left and the right mouse button for incrementing and decrementing).
- When holding [Shift] while clicking you increase or decrease the value by a sensible amount depending on the nature of the parameter (e.g. 4 for MIDI channel and 10 for panning).
- When [Control]-clicking the value of a parameter, a blinking cursor will pop up allowing you to directly enter the value on the Atari keyboard.
- When entering digits hitting [O] will zerofy the value and will try to validate the 0, no matter if 0 actually is a valid value.
- Finishing editing is done by hitting [Return], a matter which actually still has to be told (just in case you wonder why the cursor is still blinking and the application doesn't seem to respond),
- When holding down [Ctrl] while hitting [Return] the digits after the cursor are cut off and the bit until the cursor is going through validation.
- When you have entered an invalid value, an alert box will tell you so and inform you about the valid value range. Clicking the [ OK ] button will then return to editing until you have entered a correct value.
- When editing values for panning, hitting [C] will centre the panning.
- You can move the cursor using the arrow keys and delete the digit under the cursor by hitting [Delete] or delete the digit to the left of the cursor by hitting [Backspace].
- Entering new digits will overwrite the old instead of inserting them.
- Hitting [Esc] will end the editing process without updating the entered value (the old value should show up again).
- The MIDI Channel ranges from 1 to 16, 0 is accepted as OMNI.
- Some parameters will just flip from ON to OFF or a different pair of values when clicking.
- Some (like the Priority parameter) will step through a small list of values. I might someday replace this step procedure by pick lists.
- Panning values also accept L and R instead of digits in the first cursor position.
- Some parameters (such as Transpose) accept negative values and require a + or a - in the first cursor position.
- The Program Name of course accepts all characters the Akai itself would accept.
Some values (especially those ranging from 0 to 99) are displayed as faders which you can grab with the mouse and move up and down. Note that some faders contain a second parameter underneath, which is closely related to the value being faded. The name of this parameter is written along side the fader's parameter name vertically to the left of the fader. These are typically parameters with a value range of 0 to 99 or -50 to +50.
The Range parameters do accept MIDI input from your connected master
keyboard while the cursor is blinking. When entering the value on the Atari
itself, note the space in the second position for white keys while black
keys require a #.
The third position must be a + (as the Akai doesn't offer the first two
negative MIDI octaves), followed by the octave number itself.
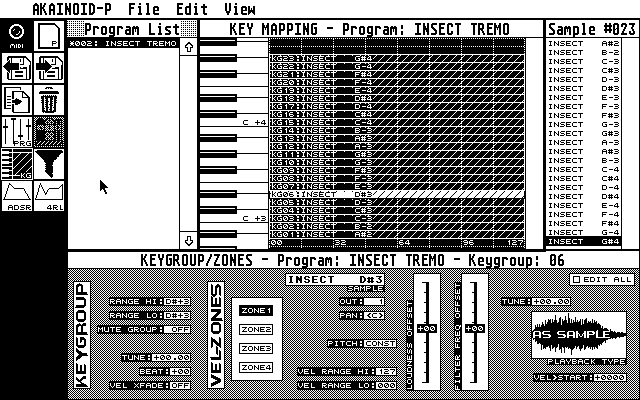
05.02 The Key Mapping Editor
The key mapping editor is showing all keygroups of the selected Akai Program (in the list to the left) as hatched rectangles next to an on-screen keyboard. The keygroup index and the name of the Sample loaded to Zone 1 of the keygroup is displayed to the bottom left of the rectangle. The vertical dimension and location of this rectangle represents the keygroup range.
When clicking one of these keygroups, it will be highlighted and in the bottom area the KEYGROUP/ZONES window will open and show the properties of the now selected keygroup.
Holding down [Ctrl] while clicking a keygroup, will replace the key-mapping editor by the Velocity Zones editor, in which you may change the range of the four velocity zones (see below).,,
You may relocate a keygroup by dragging a selected keygroup to a different note in the editor. You can scroll to somewhere else but I have to admit dragging and scrolling simultanously won't work by now. There's different ways to change the keygroup range anyways as you will read in the chapter about the KEYGROUP/ZONES editor.
You can change the keygroup's height when hovering the top end of the rectangle with the mouse. The mouse pointer will show a pointing hand, which indicates that clicking and moving the mouse now will alter the keygroup's height.
When you release the mouse button not only the Keygroup's Range parameters will be updated in the KEYGROUP/ZONE editor below but also a MIDI SysEx command will update the sampler instantly which will make the pink Program LED blink on the Akai. This is general behaviour: Any other change of any AKAINOID parameter will instantly update the Akai itself and make it blink.
In order to create a new keygroup drag a sample from the Sample List to the right and drop it onto the line of the desired low end note. A new keygroup holding this sample in Velocity Zone 1 is being created in AKAINOID and the sampler.
Unfortunately (from a screen designer's perspective) keygroups may overlap
and overlay eachother in the data structures of the S3000XL. If you couldn't
select a desired keygroup, try again while holding [Alt]. This should bring
a second keygroup being overlayed up front.
The latter is a process which admittedly isn't working perfectly by now and
still needs improvement.
You can delete a keygroup selected by hitting [Delete] or by choosing the
corresponding menu item. Alternatively click the Dustbin icon in the
ToolBox. Indices of the rest of the keygroups will be cascaded and will thus
change (considered you haven't just deleted the keygroup with the highest
index).
While you may delete the last and only keygroup of a Program, AKAINOID
doesn't like it: When trying to change a parameter in the Program Editor now
open, AKAINOID will ask you to create a new keygroup first.
05.03 The KEYGROUP/ZONES Editor
This window contains all the parameters related to an S3000XL keygroup apart from the Filter, Envelopes, LFOs and a few minor others, which have seperate windows. The Keygroup/Zones editor replaces the Program Properties window once a keygroup is selected in the Key Mapping editor above.
It also holds parameters related to the 4 velocity zones inside a keygroup. Click on one of the four Zone buttons to display the corresponding parameter set.
When you [Control]-click a Zone button, you "delete" its zone: Its sample is removed and the velocity range is set to 0.
In order to make use of an empty zone, drag & drop a sample from the sample list to the sample field of the Keygroup/Zones editor. You can also replace the sample of an active zone by dragging & dropping to this field.
There's a vertical lettering reading "Velocity Zones" to the left of the Zone buttons: Clicking it will replace the Key-Mapping editor by the Velocity Zones Editor (see below).
The same editing principles as in the Program Properties apply to this window, a few things should be pointed out though:
When [Ctrl]-clicking "Range Hi" of a keygroup, the cursor instantly jumps to the "Range Lo" field below. As soon you have entered the low range the cursor jumps back to "Range Hi" and is expecting input here. You can enter both of these MIDI notes with your master keyboard connected to AKAINOID as well.
Incrementing/decrementing the "Vel>Start"-field to the bottom right is digit-dependent like the "at:"-field in Sample Mode.
Edit All (Keygroups)
This checkbox is displayed in all windows containing parameters related to keygroups. If it is checked the same parameter change will be made for all keygroups of the same Program. Use this feature with care as
a) updating the Akai might take a while especially when a Program holds many keygroups and
b) you may not have really intended the results in their entirety.
I plan on adding a "Randomise"-checkbox to this feature, which will modify the entered value randomly within a certain range across the keygroups.
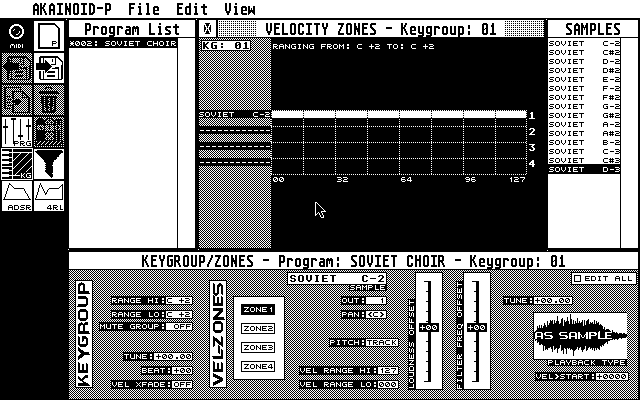
05.04 The Velocity Zones Editor
You open the Velocity Zones Editor by [Ctrl]-clicking a keygroup or by clicking the vertical lettering in the Keygroup/Zone Editor. It then replaces the Key Mapping Editor. You return to the Key-Mapping editor by clicking the closer button on the left of the window's title bar.
You will face up to 4 white bars representing the velocity ranges of the active Zones. Move the mouse pointer to the left or right end of such a bar and it will change to a pointing hand. If you click and hold the left mouse button now, you can alter the bar's size until you release the button. Down in the Keygroup/Zone Editor values are updated accordingly.
05.05 The Filter Editor
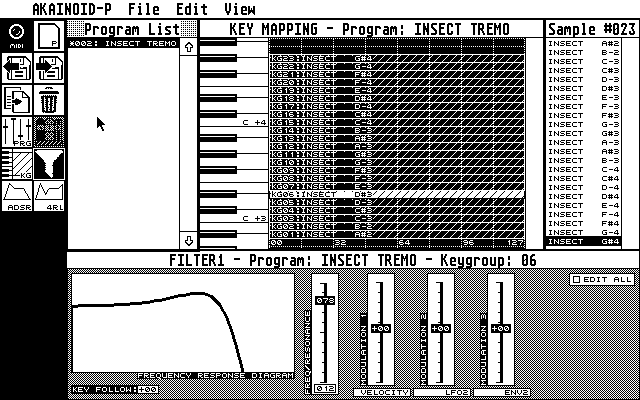
Next to a stylised frequency response graph, you face a fader for the filter frequency ranging from 0 to 99. You change the frequency by dragging and dropping the fader to a different position. Below this fader there is the filter resonance (0 to 15). Left-click to increment its value, right-click to decrement its value. [Ctrl]-click to enter the value manually on the Atari keyboard. When these values change the graph is redrawn.
Below the graph you'll find the Key-Follow parameter (-24 to +24).
There's 3 more faders for filter modulation. Step through the modulation sources below a fader by left-/right-clicking them and change the modulation depth (-50 to +50) dragging and dropping the fader itself.
05.06 Envelope 1 (ADSR)
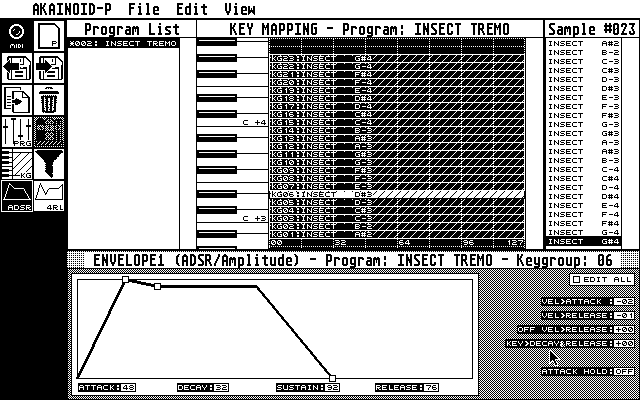
In this editor you can actually edit the ADSR/amplitude Envelope 1 by
dragging and dropping 3 Data Manipulation Points (DMPs) shaped like small
squares between the thicker lines resembling the envelope. Never mind the
dotted lines, they are just there to emphasise the borders between the 4
phases of the envelope.
It also holds the modulation parameters, which you would find in the
parallel screen labelled as "env1" on the Akai.
When dragging the DMPs the values for Attack, Decay, Sustain and Release below the graph are updated correspondingly. Note that the 1st and the 2nd DMP may overlay eachother. When clicking these overlaying DMPs, you will grab the second. Drag and drop it elsewhere and you can move the first.
Alternatively you can edit the values for A, D, S and R manually by the standard procedure (left-click to increment, right-click to decrement or [Ctrl]-click in order to enter the value on the Atari keyboard). Same goes for the modulation values to the very right of the window.
05.07 Envelope 2 (4RL)
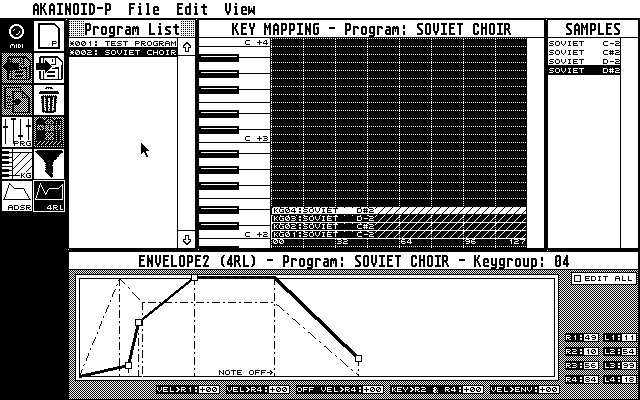
Envelope 2 isn't defined by ADSR parameters, rather by 4 pairs of Rates and Levels and can look very different from Envelope 1, however the same editing principals as in the editor for Envelope 1 apply to this Envelope, whose purpose usually is the modulation of the Filter Frequency. The graph including DMPs also shows the ADSR Envelope 1 now drawn with dotted lines, so you can sort of sync the 4RL parameters with those of Envelope 1.
The window also shows the envelope modulation parameters shown in the parallel screen labelled as "env2" on the Akai.
I plan on an additional checkbox in this screen, which restricts editing this 4RL envelope to ADSR values.
05.08 The Pull Down Menu
AKAINOID-P->About ... the application's credidentials. Click into an empty spot in order to close this dialog. File->New Program ... a dialog box pops up asking for the Akai name of the new program. An empty program is being created when you confirm the name with OK. The first thing you have to do now is creating a Keygroup for the new program. Attempts of doing anything else will fail (an alert box will tell you to create a Keygroup). File->Open ... not yet implemented File->Save ... a customised file selector will pop up. Saving will actually generate a folder with the extension ".ANP" containing - an .ANP-file, - a .SYX file - a number of .K??-files depending on the number of Keygroups held by the saved Program. File->Rename / Move ... not yet implemented File->Edit Preferences ... will open the same Preferences dialog as in Sample Mode File->Save Preferences will save all Preferences to the AKAINOID.INF file inside the application folder. File->Leave To Main Menu .. will do precisely this. Edit->Clone Program not yet implemented. Edit->Delete Depending on the focus of the application this will either delete the selected Program or the selected Keygroup. You can cancel the deletion in an alert box popping up. Edit->Deselect Keygroup will return the focus to the Program and open the Program Editor. View select a different View of the application as described above. The Librarian Properties still have to be implemented.
05.09 The Toolbox
The icons from the top left to the bottom right:
- The on-screen MIDI LED: same behaviour as in Sample Mode.
Functions
- New Program: see Pull Down Menu
- Open: not yet implemented
- Save: see Pull Down Menu
- Clone Program: not yet implemented
- Delete: see Pull Down Menu
Views
- Program Properties (Views)
- Librarian Properties: not yet implemented
- Keygroup / Zones
- Filter 1
- Envelope 1 (ADSR)
- Envelope 2 (4RL)