Under Construction
05.01 The Program Editor
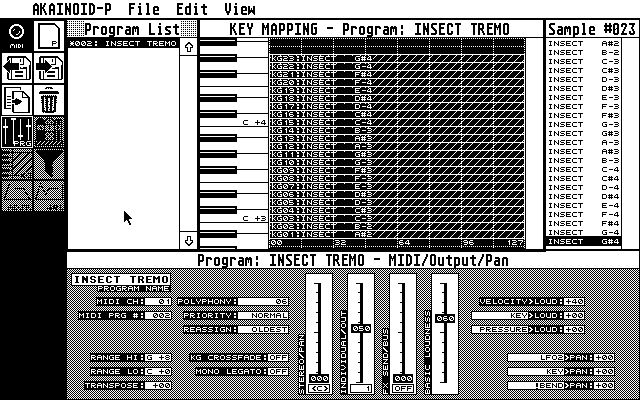
If there isn't any keygroup selected in the Key Mapping editor, the bottom area of the screen will show the Program Editor displaying all parameters directly related to an S3000XL Program and not to one of its Keygroups.
These parameters all have the same label as when editing on the S3000XL itself and their purposes can be looked up in the S3000XL Operator's Manual by Akai.
- Typically you increment a parameter value by left-clicking it and decrement it by right-clicking it (I might add a feature allowing to swap the left and the right mouse button for incrementing and decrementing).
- When holding [Shift] while clicking you increase or decrease the value by a sensible amount depending on the nature of the parameter (e.g. 4 for MIDI channel and 10 for panning).
- When [Control]-clicking the value of a parameter, a blinking cursor will pop up allowing you to directly enter the value on the Atari keyboard.
- When entering digits hitting [O] will zerofy the value and will try to validate the 0, no matter if 0 actually is a valid value.
- Finishing editing is done by hitting [Return], a matter which actually still has to be told (just in case you wonder why the cursor is still blinking and the application doesn't seem to respond),
- When holding down [Ctrl] while hitting [Return] the digits after the cursor are cut off and the bit until the cursor is going through validation.
- When you have entered an invalid value, an alert box will tell you so and inform you about the valid value range. Clicking the [ OK ] button will then return to editing until you have entered a correct value.
- When editing values for panning, hitting [C] will centre the panning.
- You can move the cursor using the arrow keys and delete the digit under the cursor by hitting [Delete] or delete the digit to the left of the cursor by hitting [Backspace].
- Entering new digits will overwrite the old instead of inserting them.
- Hitting [Esc] will end the editing process without updating the entered value (the old value should show up again).
- The MIDI Channel ranges from 1 to 16, 0 is accepted as OMNI.
- Some parameters will just flip from ON to OFF or a different pair of values when clicking.
- Some (like the Priority parameter) will step through a small list of values. I might someday replace this step procedure by pick lists.
- Panning values also accept L and R instead of digits in the first cursor position.
- Some parameters (such as Transpose) accept negative values and require a + or a - in the first cursor position.
- The Program Name of course accepts all characters the Akai itself would accept.
Some values (especially those ranging from 0 to 99) are displayed as faders which you can grab with the mouse and move up and down. Note that some faders contain a second parameter underneath, which is closely related to the value being faded. The name of this parameter is written along side the fader's parameter name vertically to the left of the fader. These are typically parameters with a value range of 0 to 99 or -50 to +50.
The Range parameters do accept MIDI input from your connected master
keyboard while the cursor is blinking. When entering the value on the Atari
itself, note the space in the second position for white keys while black
keys require a #.
The third position must be a + (as the Akai doesn't offer the first two
negative MIDI octaves), followed by the octave number itself.